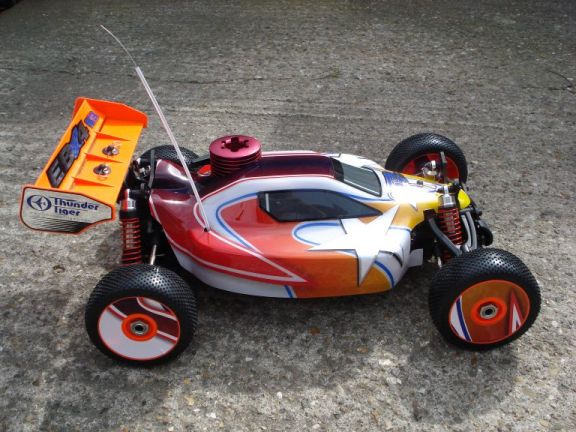
Thunder Tiger EB4 S3
Pro-28BX-R 4.6cc Nitro 4WD RC Car
On this page you will find a full history of this excellent car including photos, videos and repairs.27/04/2010
Bought this and thought I would do the same as I have done with the Shengqi Hummer. Document its progress. I got this one from Model Zone in St Stephens in Hull. I thought that maybe this time it would be easier dealing with a shop closer to me than 70 miles away as I did with the Hummer. The folks in there were friendly, helpful and knowledgeable, all apart from a bit of a hiccough with the radio failsafe, I was told it did not have one but I discovered that there is one inbuilt into the receiver.
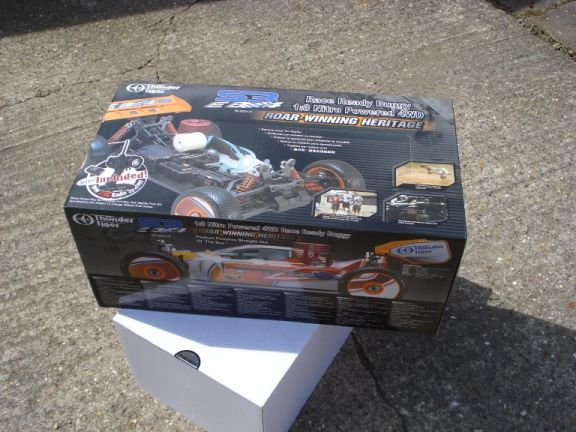
This is the box it came in:
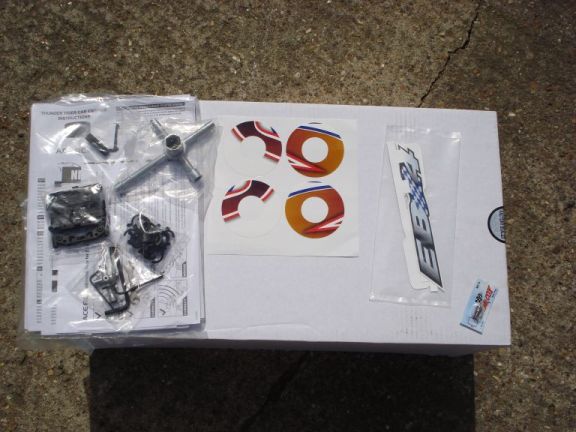
It came with a good selection of reasonably useable tools, stickers, spare adjusters for the suspension and a few other fiddly little bits:
I bought a starter kit with it:

The radio set:

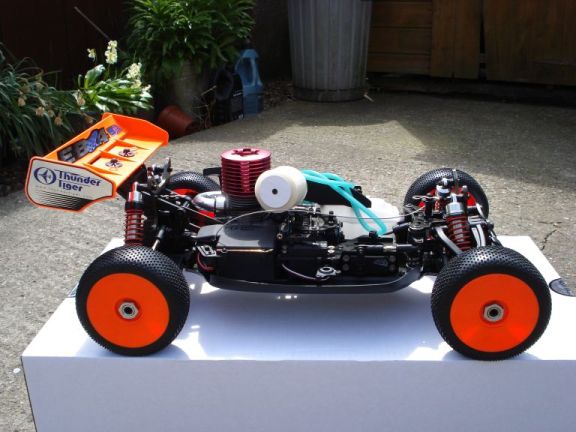
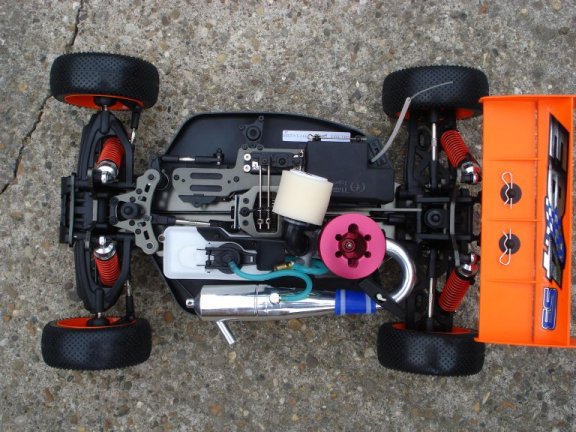
A couple of views of the inside of the car straight out of the box. Note one of the few problems, the fuel line is all wrong:
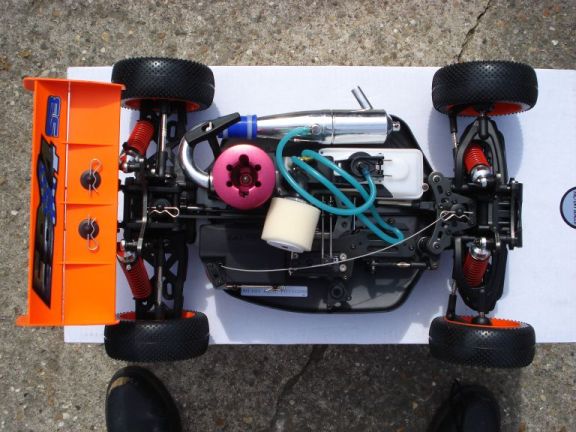
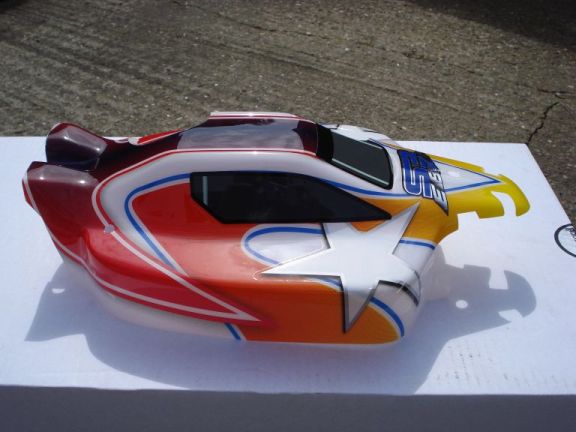
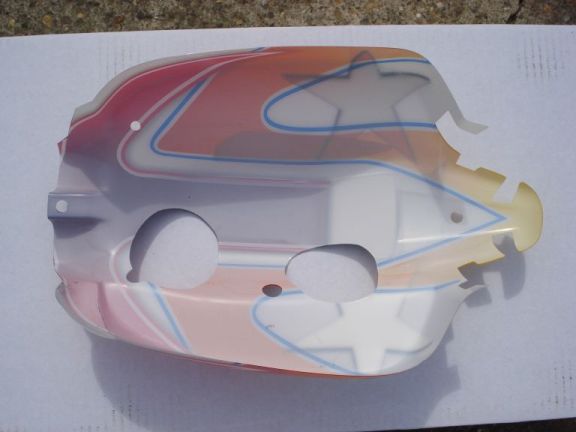
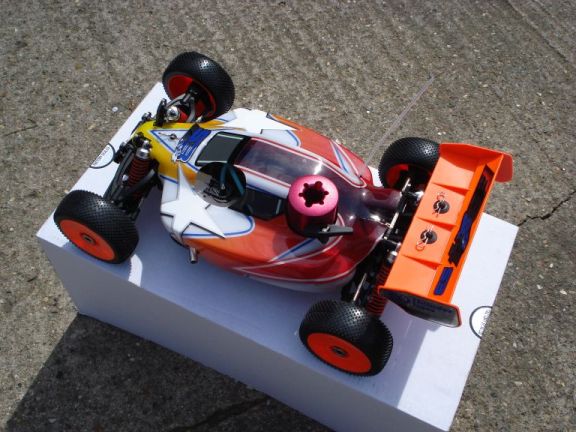
The Shell:
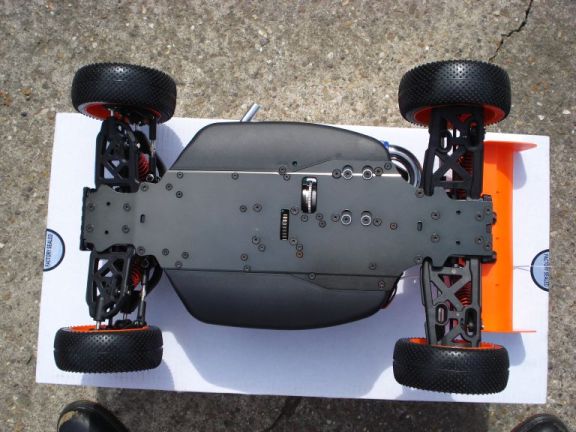
Underside:
All together:
After day one sorting out:


Insides All Ready. Note the fuel and pressure lines now sorted out:
27 04 2010
Bought. Nothing done to it, just looked over it and read info.
28 04 2010
Trimmed fuel and pressure lines. From the photograph taken before I started, you can see that the pressure and fuel lines were all over the place, they simply needed shortening and running directly from A to B instead of going via Oak hampton
Removed fuel line clip from bodywork as it was no longer in the right place.
Adjusted front steering by screwing rod near the servo clockwise (looking from the front) six sides of the nut.
Adjusted rear offside wheel by turning top rod nut anti clockwise (looking at it from the offside) 4 sides of the nut.
Applied stickers to wheel hubs.
Tidied up battery box.
General check of all nuts and bolts. Nothing at all awry. Seems to be ready for first run.
First impressions. Compared with the Shengqi Hummer, the initial checks have gone really well. Nothing to do really. All the nuts and bolts were OK. Nothing seems to be broken or missing. The radio seems good, it does not need a crystal, pairs up with the receiver and selects a free frequency. It has an inbuilt failsafe. There is plenty of useful documentation with it. I need to run it in now.
29 04 2010
Oiled the carburettor air filter. Charged up all the batteries. Adjusted the main air screw. Tested the glow plug. Filled up with fuel. Pulled the starter cord a few times with the throttle open and my finger over the exhaust to prime the fuel line. Connected the glow plug. starter, switched on the radio and tried to start it. After half a dozen pulls with no response, I screwed the air screw out about 1/8th of a turn and retried. It started on the second pull. Opened the throttle and it stalled so I started it again with one pull. It was like this for a few goes but then after a short time I had it going around in circles of sweet smelling smoke in my garden. It stalled a couple of times but started first pull. Eventually I learned how to keep it going. After the first tank full of fuel (about 5 minutes), I refilled and had a perfect run until the tank emptied. I emptied the tank 6 times before rain made me pack up and go indoors.
The only incident was the whip aerial falling off as I had not pushed it into place firmly enough. Oh, alright, I skidded into a bush and bounced off a shed in two mishaps. No damage though.
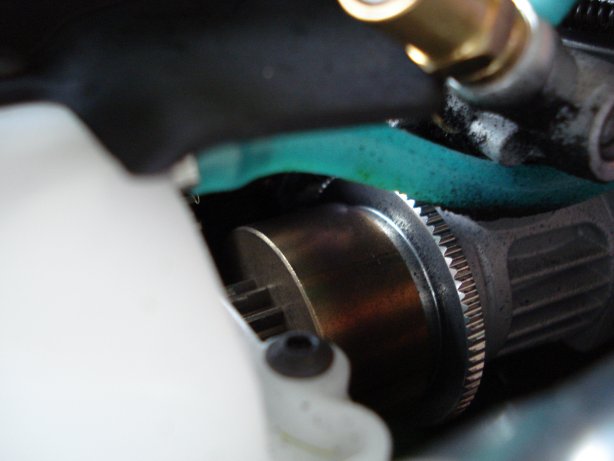
Checks revealed what looks like either plastic or clutch material sprayed around the clutch area. Probably clutch material from allowing the clutch to slip too much. I may dismantle it to have a better look.
Here you can just make out the deposit of black material under the fuel line and high speed screw:
All in all a good first run I would say. Very enjoyable. Second impressions, a great toy. I really must get some video of it next time I run it. I have given it a clean up, it's all ready for next time now.
30/04/2010
Waited all day for the weather to clear up and just managed to squeeze in one run before it rained again. I am a fair weather person, cycles, motorcycles and playing with toys is only done in the dry. It started after half a dozen cranks but stopped as soon as I tried to pull away. In several stages, I screwed the fast running screw on the carb in half a turn. It then ran pretty well. It ran for about 10 minutes this time on one tank full. No mishaps, no breakages and I think, no fresh fine black powder sprayed around the engine area. I did try to take a video, but with one hand on the camera and one hand for throttle and steering, it was a bit too wobbly for putting on YouTube, so that will have to wait until I get a run with someone else about.
01/05/2010
Another run in the garden. Several tanks of fuel emptied. Started and ran really well, still running it a bit rich. Will probably tune it up a bit more next time. Turned it over once by turning too sharply too quickly on a bumpy surface. I have done nothing about setting up the suspension yet. I also ran into a wooden flowerpot thing at very low speed. No damage at all. Worst thing was though: I claimed my first victim with it and ran into Gill's foot while she was videoing it for me. She didn't get out of the way quickly enough and I didn't realise she was there! Oh dear. She demands a bag of peas at the end which is the usual treatment to stop bruising that we use.
No damage to it at all again today. Just a small amount of grass here and there. A sprinkling of that black dust again around the inside near the engine. Not as bad as the first time. I will keep an eye on it. I am fairly certain now that it is the clutch by the looks of it. £6 To replace the parts.
02/05/2010
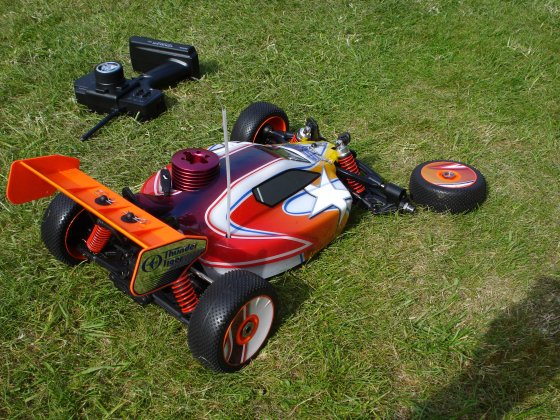
Another run in the garden. Once more turned it over in almost exactly the same place in the garden. Started just the same, very easily. Once it was warmed up, started first pull on refuelling. I have now used up most of my first half gallon. This is going to prove expensive on fuel I reckon. Only incident was a bounce into the shed caught on the video below (oh, all right, a couple of bushes jumped out in front of me too). No damage. The fine black powder near the clutch area is still appearing in smaller and smaller amounts. I hope it is just the clutch settling in. There doesn't seem to be actually anything wrong with it and there was virtually nothing to clean up this time. Still running the engine rich but not for much longer. I reckon as soon as I get on to my next batch of fuel I will work on tuning the engine up properly. I know I have said this before, but I am really pleased with this car it is performing very well. Below is a video made by Peter. It is a bit wobbly here and there but I have put it up warts and all because I think it is worth it.
05/05/2010 A good run in the garden where I finished off the first half gallon of fuel and started into a new gallon of the stuff. I tuned it up a bit so it is not running so rich now, it seems to be going really well. Just as I was about to pack up, a disaster happened (well not so bad really). The front offside wheel fell off. Fortunately, it was going slowly and the wheel didn't fly on too far. The nut had simply undone and fallen a few feet behind. No damage. I checked the tension of all the other 3 nuts, refitted the wheel and carried on with the run.
Discovered that Model Zone in Hull had really ripped me off for the cost of the fuel. It was £16.99 for half a gallon from Model Zone. I bought a full gallon for £17 from another model shop in Hull, exactly the same stuff. Not only that, whilst sussing out prices, I rang Model Zone and asked their prices and was only quoted for half a gallon, I asked how much for a gallon. I was told 'two half gallons make a gallon'. From that odd comment I assume they meant they only stock half gallons. I am not sure I will return to their shop after that.
22 05 2010 A good run at Boston. Nothing went wrong at all apart from the new whip aerial falling off right in front of me, oh alright, a sideways skid into my lad's assembled stuff whilst he was trying to start his Talon NX up, bit embarrassing really. Only thing damaged was my pride. I drove it flat out for an hour or so. Previously it has taken about 30 seconds to a minute to get up to a working temperature condusive to running. i.e. it conked out a few times when cold. This time, it started on the second pull after priming. After letting it tick over for about 20 seconds, it set off without problems. I emptied six 150ml tanks of fuel (Model Technics Duraglo 16) on this occasion, all mostly at full throttle. As time went on, you could feel and hear the engine was running better as it settled in, the acceleration improved substantially. It was a seriously hot day (for the UK) but there seemed to be no ill effects from heat. I mention this because I think my lad's Talon NX did suffer from overheating that day (while it was not suffering from being a sitting duck that is) .
The aftermath: None of the black powder previously mentioned around the clutch area found inside the car, whatever was going on there has settled down hopefully. There is still a lot of smoke coming from the engine and a decent residue on the left side of the car that has been blown out of the exhaust. I am not particularly concerned about this as I am happy with the engine's performance. I still need to make the mixture a bit leaner though. Maybe next time I will tweak it a bit more. The car gets very little filth inside it. The bodywork really does do a good job of protecting the car.
I have exchanged the whip aerial. I put a longer, more suitably coloured one on my ShengQi Hummer. It just so happens that the old yellow Hummer one looks quite good on the Thunder Tiger and has trimmed to the perfect length for it too. You can just make it out on the video below.
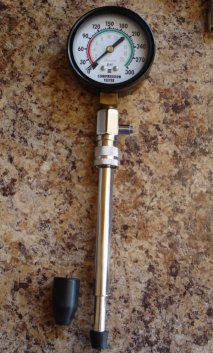
30/05/2010 Engine (PRO-28BX-R) compression test 68psi. Done with a tester I use for my Motorcycle. I had to remove the usual rubber end of the push on probe from the gauge and use a very short length of motorcycle fuel line to the plug hole, see photo below. I am assuming that it is not entirely accurate but it will be a good guide to go by for future reference. I read that the compression should be 35 to 60psi.
21/04/2011 First run of the year, a short test in the garden. After ten minutes of fun, the car lost traction, engine revving, but no movement of the car. I immediately suspected the clutch. Popped the engine out (it was easy, unclip the throttle linkage at the carb, slip off the fuel and fuel pressure lines, undo the grub screw on the far mounting of the exhaust, four hex bolts underneath and out comes the engine. The clutch shoes did look very worn, in fact so worn that the clutch springs had been engaging with the clutch bell housing. This wasn't the problem though, as it happens, it was fortunate that I had examined the clutch though, I ordered some new clutch shoes and springs. The problem was a grub screw in the rear center drive shaft (PD1567 5x4mm) had come loose and dropped out somewhere. Fortunately, I have a bag of these as spares so the repair took a few seconds, remembering to put some loctite on it. Hadn't needed to remove the engine at all but I am pleased I did.
27/04/2011 I have had it exactly one year now. Replaced clutch shoes, the springs have not arrived yet, so re-used the old slightly worn ones. Test in the garden. There still seemed to be something wrong with the transmission as, at first, it was slowing and stopping with the engine running when going from concrete onto grass. I could not work out where the problem was but eventually, it started running well and so continued until the tank emptied. After emptying the tank, I had a closer look to discover that (despite my careful checks) the grub screw in the front center drive shaft had disappeared this time. I had checked this but obviously not well enough. Replaced and thread locked the grub screw, good job I have a bag full of these screws. Threadlocked all the wheel nuts.
The new clutch seems to have performed OK with no sign of those black specks that appeared with the old clutch.
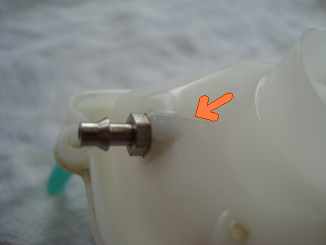
01/08/2011 Having smashed up my helicopter I decided to give the car a go. Noticed a bit of unexpected fuel around the place. Found the fuel tank had at least 4 cracks in it in various places. Discovered that there had been a batch about 3 years ago with brittle tanks. Rang the UK importer who more or less fobbed me off. Ordered another tank (part number PD1953) £16 total from Sussex Model Center 01903 233817. I did fix the original using Araldite. Seems OK.

28/08/2012 Run at Paull with all the other cars. Went reasonably well but kept stopping and eventually would not restart. Didn't manage to empty the tank fully on the last top up although used about 3 tanks worth. Whether this is a problem with the new tank (later addition, the nipple on the top of the tank where the pressure pipe is attached needed tightening, air and fuel was leaking out of the joint), the fuel or the carb, I have yet to suss out although the air screw did not have an effect on the car reguarly stopping. I've had the fuel 2 years and I suspect it was old when I bought it, so probably 3 to 4 years old. Having Googled it I read that Glo fuel can last a long time, it absorbs water when exposed to the atmosphere, this can actually improve performance in small amounts (expansion of the water as steam adds power) but too much water is no good. It will absorb more moisture as the container empties (I read), mine is now half gone (yes, that's the way I look at things, a pessimist). Another interesting fact is that water can be absorbed but doesn't change the volume of the fuel, something to do with water molecules being smaller than the fuel molecules apparently. Intend to get some new fuel with a higher nitro percentage.
31/08/2012 Paull with the lads and all our cars. Used 25% nitro, went like a rocket, burned out one glowplug (a cheap and nasty one that John had in his box), another two initially looked as though they were gone but later checks prove them to be OK. We shall see next time. Engine tuning has a very important part to play in glow plug life. Too rich or too lean a mix and the glow plug will die quickly.
15 04 2017 Played with it a couple of days back and the radio broke. Despite the failsafe working correctly when tested beforehand, after a good (well, fantastic really, it went a treat) run around the garden for half an hour or so, the car shot away out of control and ran into my fence via the rhubarb at high revs, sitting there on its side at top speed. Luckily, it was stuck in the newly grown (now wrecked) rhubarb and there was no damage to anything that won't grow again. I stopped the engine and examined everything. The radio had broken. It was totally shot, a component on the board was burned out (R3, but the printing is so tiny, It could be something else. To be honest, it doesn't matter). I Googled a replacement radio receiver and decided that rather than fix it myself, at £49.99 for a replacement, despite it being logical and feasible, I would rather give the setup to my youngest kid for him to fix and play with my other toys instead. I have asked that he passes on pics and video for future documentation here, so you never know.
How to "READ" your glow plug.
The following info taken from hereOS and Turbo glow plugs go gray sooner [easier] than McCoy plugs; this is not necessarily bad. When a new plug wire goes slightly gray after a 5 or 10 minute hard run it means you're very close to an optimal tune. Careful as the next step is TOO LEAN!
Rule of thumb.
1: Wire and plug wet, with like new shiny wire = rich side of optimum power 85%
2: Wire and plug starting to dry, wire starting to gray = Very close to optimum power 95%
3: Wire and plug dry, wire totally gray but not distorted optimum power 100%
4: Wire and plug dry, wire distorted = slightly lean DANGER!
5: Wire and plug dry, wire broken and distorted or burnt up = extremely lean possible engine damage!
You can only "Read" your plug in a nearly new state [Wire like new and shiny]. A gray plug can still operate well, but after it has gone totally gray, performance can start to fall off. To test, put in a new plug and if there is no difference in performance, save the gray one or put it back in. If your engine does not feel or run right try a new plug before making major tune changes.
Recommended plugs for the Pro 28:
Thunder Tiger 9281 (R2)McCoy #9 / #59
Novarossi C4S / C5S / C6S
OS #8 / #A3 / #A5
Picco P6S / P7S
Tuning The Carburettor
This information does not cover initial running in settings and is taken from the manual with settings gleaned from various message boards. I am still learning how to tune this engine so these settings are not for definite. More as I learn more.This engine comes ready to start with settings for running in. It will then need tuning properly. From what I have read, and from experience, in a nutshell, do whatever it takes to get it running right for you. Listed below are the current settings I use. Bad tuning wrecks plugs and engines. Warm the engine up first. Give the car a run of a few seconds between changing settings.
The carburettor has 4 points that can be adjusted:
1. High Speed Needle (from now on referred to as HSN). Currently: 2 1/2 to 3 turns out from closed.
2. Mixture Metering Screw (Low Speed Needle, from now on referred to as LSN). Currently: 1 1/8 turns from closed.
3. Mixture Metering Needle (Mid Speed Needle, from now on referred to as MSN). Currently: 1 1/2 turns out from flush with carburettor.
4. Idle screw. .5mm gap in throttle slide.
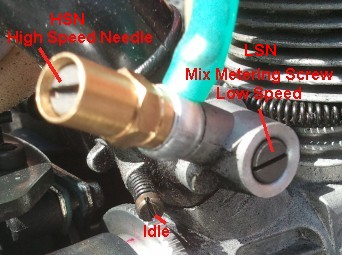
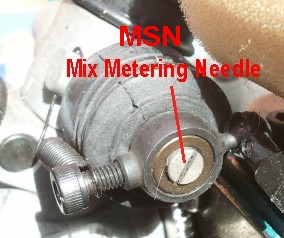
To adjust the MSN to the factory default setting, the LSN should be screwed in or out until its head is flush with the carburettor body. Then the MSN should be screwed in or out until its head is flush with the carburettor body. Then screw the MSN out 2.5 turns. The manual says not to adjust the MSN. It should be about 1 to 1 1/4 turns out going by reports I have seen. The setting in the photo above is 1 1/2 turns out from flush with the carburettor body.
I have read (but cannot confirm this is true and assume it is only a guideline any way) that the LSN controls the first 5 feet, the MSN 5 to 20 feet and finally after 20 feet the HSN is in charge.
Adjust the HSN first. To adust the HSN, screw it in (clockwise) for a leaner mixture and screw it out (anticlockwise) for a richer mixture. 2 1/2 to 3 turns from fully screwed in is a good starting position.
Screw the needle right out (about 5 turns from fully screwed in). Adjust inwards small amounts (1/8 to 1/4 turns clockwise) until turning the needle anticlockwise causes full engine revs to drop a little. When the optimum position is found, turn the HSN back out (anticlockwise) 1/4 of a turn to make the mixture a little rich. This position is usually 2 1/2 to 3 turns out from closed according to reports I have read.
Adjust the Idle Screw. To adjust the idle speed, screw the adjuster out (anticlockwise) to slow the engine and in (clockwise) to speed up the engine. The gap in the throttle slide should be about .5mm. Find the lowest possible engine speed before the engine stalls.
Finally, adjust the LSN. To adjust the LSN, screw it in (clockwise) for a leaner mixture and out (anticlockwise) for a richer mixture. 1 second full throttle, 10 seconds at idle. If engine speed drops at idle and then stalls, turn the LSN in (clockwise) 1/4 turn. If the engine revs stay the same or go up at idle, turn the LSN out (anticlockwise) 1/4 turn. Repeat until the engine rpm drops after a few seconds at idle but does not stall.
As I said at the start of this section, I am still learning how to tune this engine so the settings mentioned here are not for definite. Please feel free to contact me and let me know the settings that you use.