Initial Checks and Problems
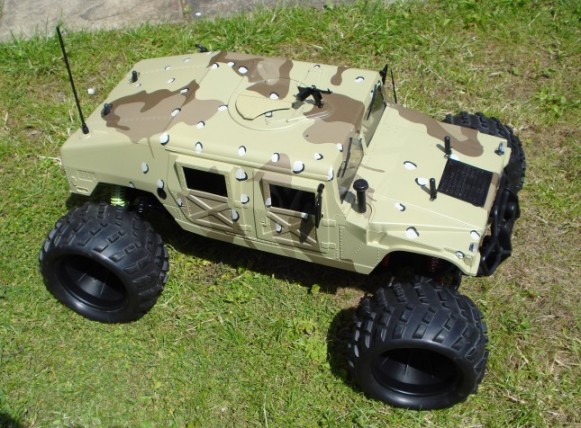
It took me more than a year to talk my wife into letting me have one of these. Eventually she caved in and off I went to pick it up.I had read up a lot about this particular model on the internet, so I thought I knew what I was letting myself in for. I had read all sorts of conflicting things about it, so I thought it might be helpful to document my own experiences with it here.
I had a lot of sorting out to do before even starting it up. With it being a cheap model, there were a few things that needed checking and sorting out first.
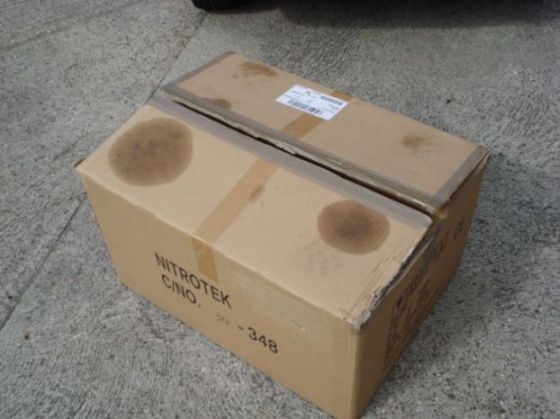
I noticed oily patches on the top of the box and thought no more of it at this stage. The first thing I did when opening up the huge box that was inside another huge box was to check everything was there. It all appeared to be there apart from there being two right hand wing mirrors and no left hand mirror. A quick follow up of this by fitting showed that it was not possible to make it work, so I ordered the correct one.
Then I began painstakingly checking every nut, bolt and screw on the car. The radio box mounting pegs were split open where either the screws that had been used on it were too large or they had been over tightened. Looking at the exploded parts diagram, they appear to be the correct screws but I am fairly sure that they are too big for the job. Anyhow, the radio box seems to be held securely enough, if it loosens at a later stage, I will just drill out the pegs and use nuts and bolts. Or as I have seen elsewhere just remake the whole radio mounting plate as there is a fairly hefty steering servo mounted on it and the plastic of the original plate is a bit bendy. I hasten to add that it does do the job adequately though. There was a small crack in the windscreen where it looks like the mounting screw had been over tightened when fitting. It will no doubt get larger. That part looks easily replaceable with any sort of clear plastic, so it is not a problem. I may superglue it but that might just make it look worse. If it starts spreading, I will have a rethink.
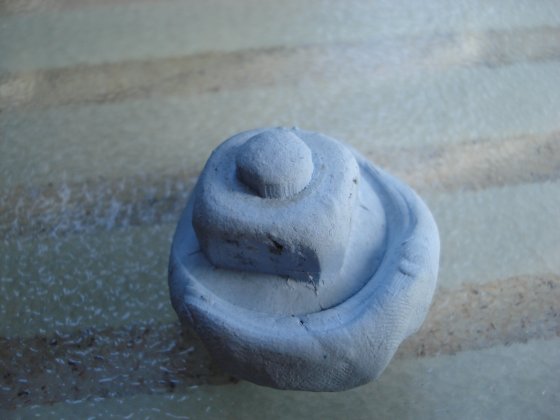
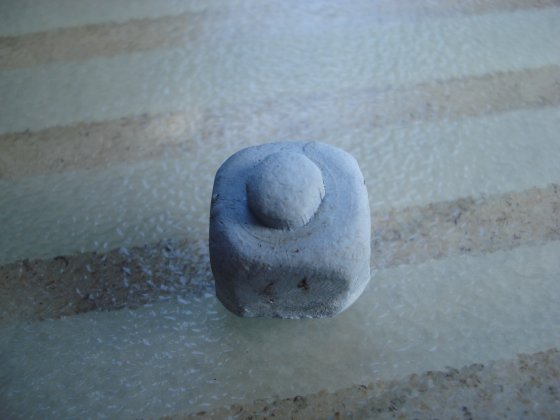
Below, the battery box pegs showing the split left one and mis-shapen right one.
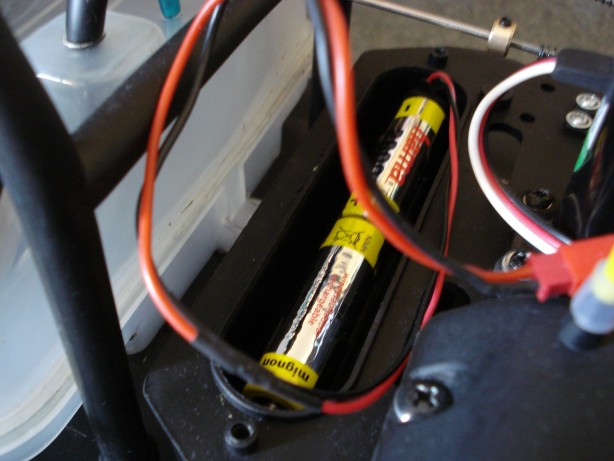
I had put the radio battery pack on charge at the start of my checks. After about 2 hours I noticed the charger was a bit hot and smelling of hot plastic. I noticed that it had started to get mis-shapen. The batteries were hissing which as far as I know is normal. After this 2 hours, I checked the battery pack voltage and it was showing just over 1 volt. It should have been around 6v. So there was something else to get replaced. I made up my own battery pack from a 4xAA battery holder and a radio receiver battery lead. They fit very neatly into the battery box and are currently 2700 mAh which is considerably better than the original of 1100 mAh. Also it's a lot cheaper to have a pocket full of spares with you too.
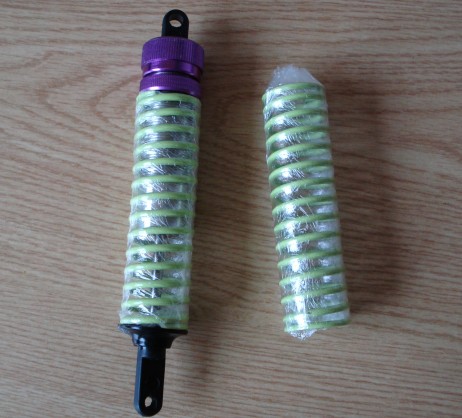
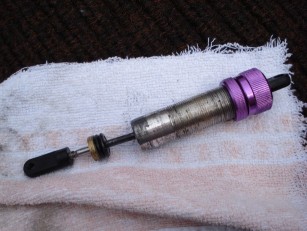
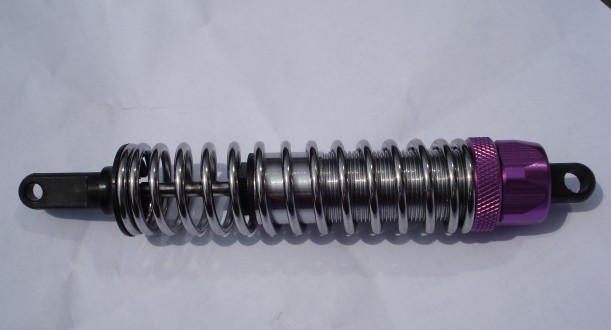
I came to the shock absorbers. Bit of a disaster there really. One was fine. The other 3 were leaking. This explained the oily patches on the box where the car had been sat on display. One was empty, the screw in plate at it's base was loose and the threads on the inside of the shock for it to screw into were stripped. Another was about OK for oil but was leaking down the threads of the same bottom plate, I fixed that with a bit of PTFE tape in the threads. The last was leaking in a similar way but was nearly empty and I was unable to fix that. So my first run was made with shocks on the rear with no oil in. No problem as the first couple of runs have to be slow and steady to run in the engine and iron out all the other bugs that show up. Two replacement shocks were added to the order for replacement parts. Later, I realised that all the shocks were awful and Nitrotek are currently sending me replacements for them all.
The supplied toolkit that was supposed to give you all the tools required, did not in fact do that. However, that is academical as I would not use them anyway. They are very poor quality, not worth risking using. I bought a nice set of suitable tools for it.
Not a bad list of initial problems I think, it could have been a lot worse. EDIT. See later for the things I missed!
Setting it Up
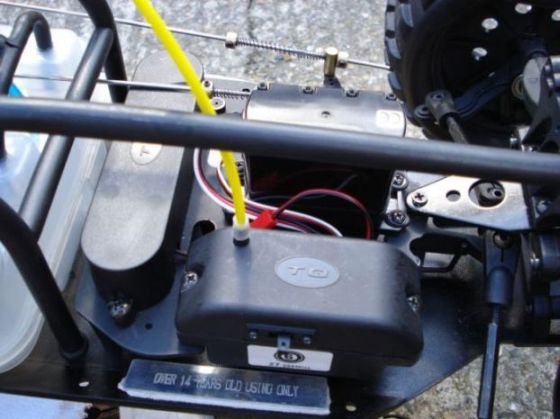
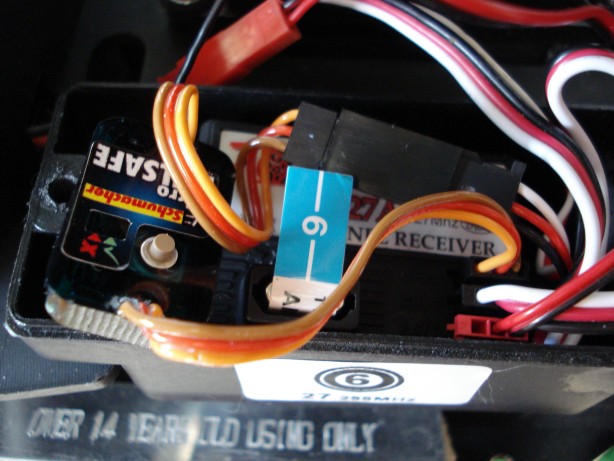
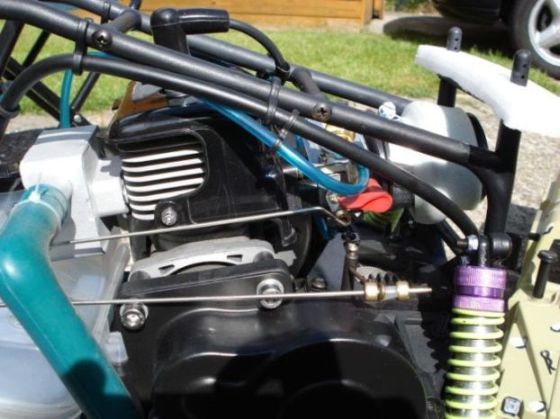
I had read a couple of reports of the exhaust pipe melting the fuel tank, so I carefully positioned the exhaust to ensure it was not in contact with anything. As you can see from the photographs, it is possible to do it, but there is very little leeway.I fitted a radio failsafe to the throttle servo. One minor problem was that there was a little extra locating tag on the Shengqi radio plugs, this was OK on the radio receiver, the failsafe lead plugged in without a problem. The servo plug would not fit into the failsafe due to the tag, I adapted the failsafe rather than cutting the tag off the servo plug by cutting a slot in the socket for the tag to slide in to.
Below, the radio box showing a bit of a tangled web woven and the failsafe fitted.
One problem I had heard of was shafts falling out of the rear drive assembly. There was a separate book of instructions included in the box from Nitrotek. Part of these instructions were devoted to making it very clear that the rear wheel assemblies had to be adjusted correctly before use. For some reason they are adjusted inwards for transport, pressing into the center and if not re-adjusted, the pressure causes casing to wear out and bits to then fall off.
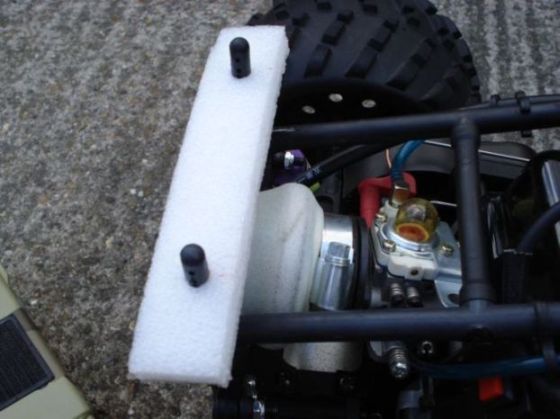
Needless to say, I adjusted the wheels. I also replaced the supplied foam protectors for the body with, on the inside fairly stiff foam strips and on the outside with sticky felt pads. So, apart from checking all the nuts and bolts I could find, that was the total of my setting up.
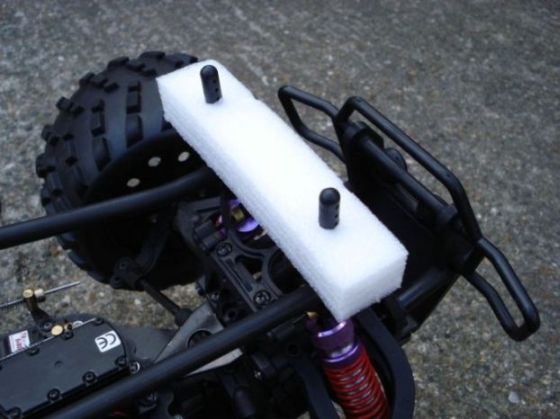
I sorted a potential problem of losing the clips for the body shell. They had pinged off in various random directions whilst checking out so I thought it best to make them as unlosable as possible. Fishing line tied to two clips then threaded through the holes of the shell seems to work. This photo shows the tied together clips and the felt pads.
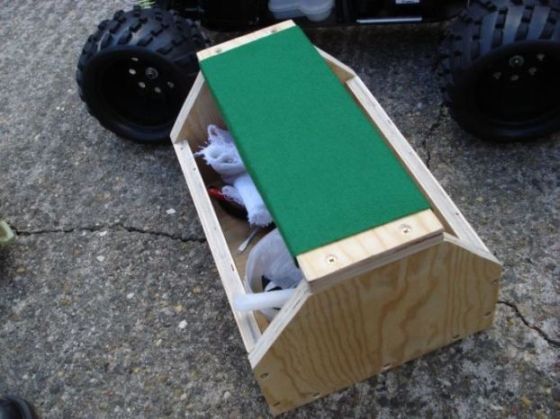
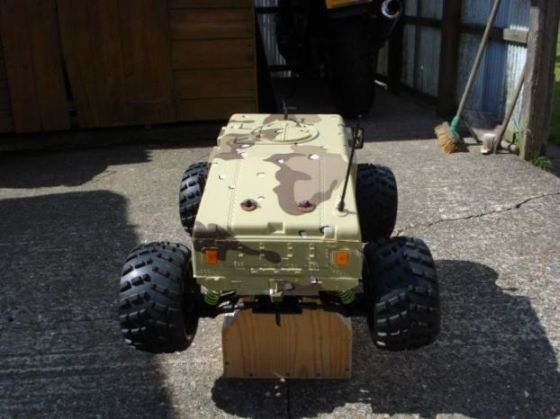
I made a box to stand the car on for storage and starting. It holds all the tools too. It is also something handy to sit on.
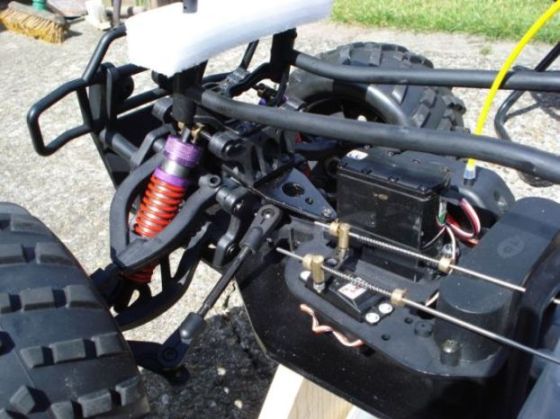
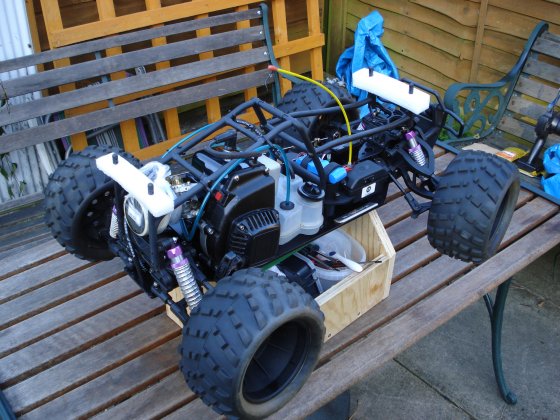
A few shots of the insides of the Hummer.
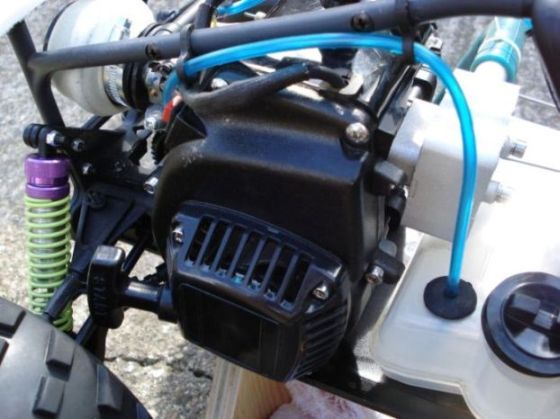
This shot shows the air filter I added. A tube of foam soaked in air filter oil and then stretched over the original air filter.
The home made battery pack in place.
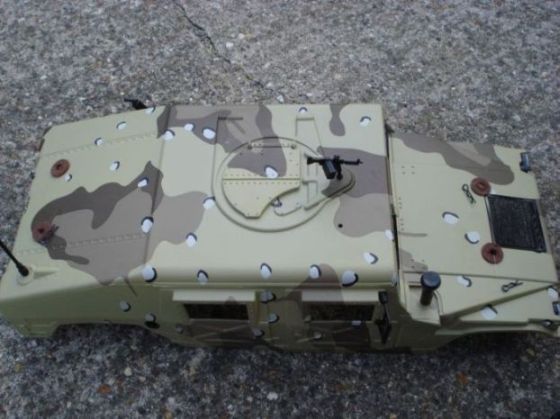
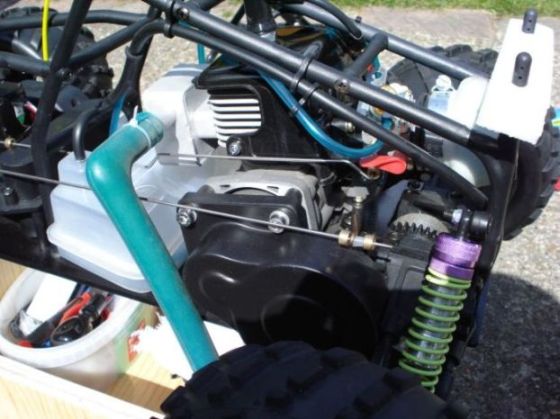
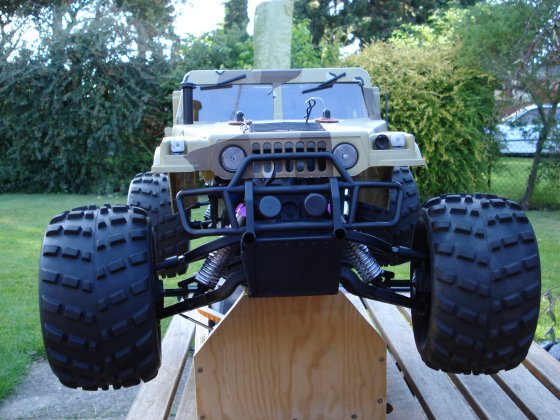
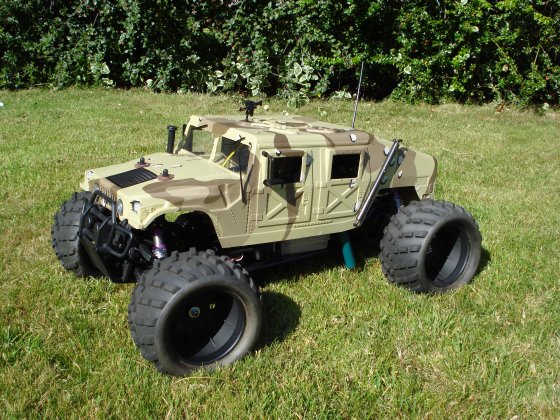
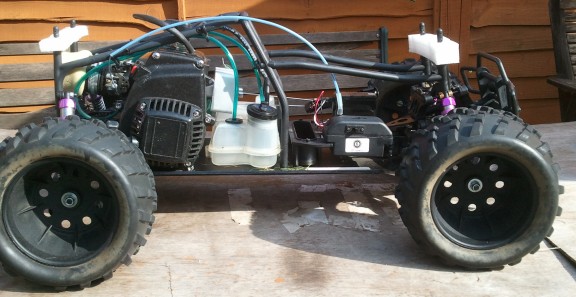
Views of the Hummer ready to go.
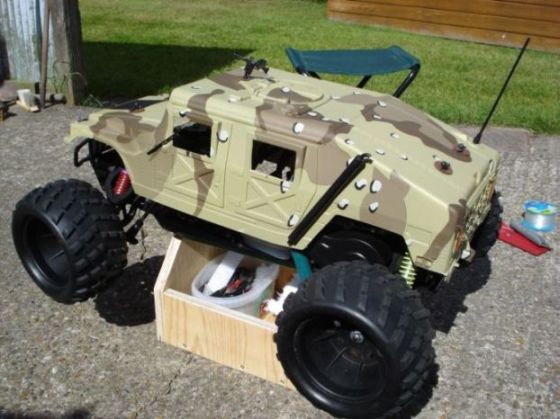
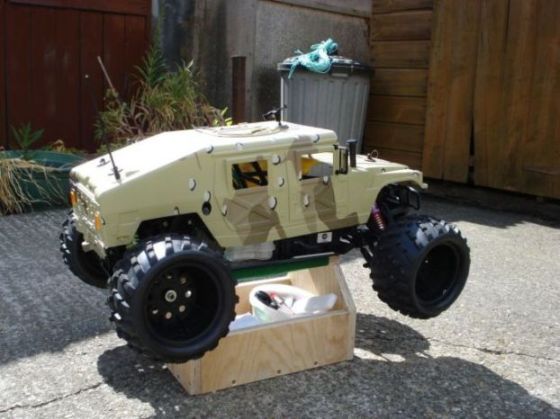
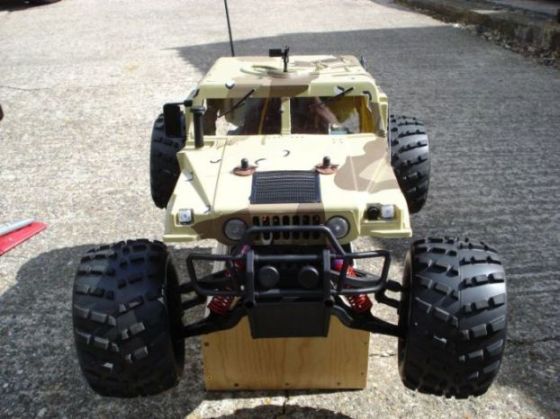
12/Sep/2009 Above and below. Finally as it should have been when I bought it. It took 3 months to get all the right bits from Nitrotek.
The First Run and the Aftermath
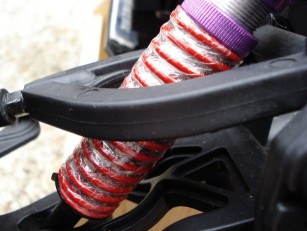
16/06/2009 Then came the first run. All went well. I planned to start it at home and then, once I knew it would run, to then go to some open ground. It started, I gave it a run around my garden and went so well around it that I decided to use the tank of fuel up in my garden. Here is a bit of video of the run.Checks after the first run revealed one wheel that had come slightly loose. Quarter of a turn on the wheel nut did the job. I realised at this point that it might be a good idea to make some covers for the shock absorbers as they seem to attract all sorts of muck which can't be good for them. I have seen shock covers on eBay for about £8 but I feel sure there must be a quick and cheap way of doing it. Cling film for instance.
Cling film experiment. I will give this a go and see what happens.
The Second Run
21/06/2009 Run at Boston with John with his helicopter and Talon NX. Went for the weekend to Boston and found a good area very near his home for a steady run to continue the running in process. No problems again apart from one of the bum shock absorbers (the one with the stripped threads) fell apart. The cling film shock cover seems to have worked.Here is the aftermath of that very successful run. Proof the clingfilm worked on a steady run at least. The shock absorber that fell apart.

Shock Problems
Below is a replacement shock that I received from Nitrotek. Unfortunately, it has a different construction and different action to my existing shocks. So I am still scuppered. The new one does seem to do the damping a lot better than the old ones. In fact, now I realise how awful the original set are. I also sent off for some shocks from eBay. The seller was good but despite all my efforts to check they were OK before buying, when they arrived, they would not fit properly. They were meant for an FG Baja but it did say they would fit a Shengqi. At a push, with adaptations of the fittings, they would have done but I sent them back.1/07/2009 a bit of a problem with the replacement shocks from Nitrotek. Only two arrived when apparently a full set were supposed to come. Anyhow, it was the rear two that came, so I gave them the clingfilm treatment and fitted them. There is now an appreciable difference between the back and front of the car. The front bounces about all over while the back seems to be as steady as a rock. Fingers crossed the front arrive in the next couple of days.
Third Run
01/07/2009 Hummer run 3 at Paull (starting with a bit of a warm up in my garden). New rear shocks. Front ones still horrible, awaiting new ones. Still running in but this is the last steady run. One mishap, unfortunately not caught on camera. It took a bad bounce on a turn. I am fairly sure it was the fault of the front suspension. It rolled onto its roof and waited for me to come to rescue it, engine still running. No damage whatever, not even a scratch. So much for the reports of the shell shattering as soon as it hits something. One thing worth mentioning is that when the tank gets down to about 150ml of fuel, the engine stops easily (on a turn). I have read reports of the tank being leaky. My experience so far is that a very small amount of fuel is found around the grommet on the top of the tank but it is not a problem.Carb Primer Plate Problem. The Fuel Tank Sorted.
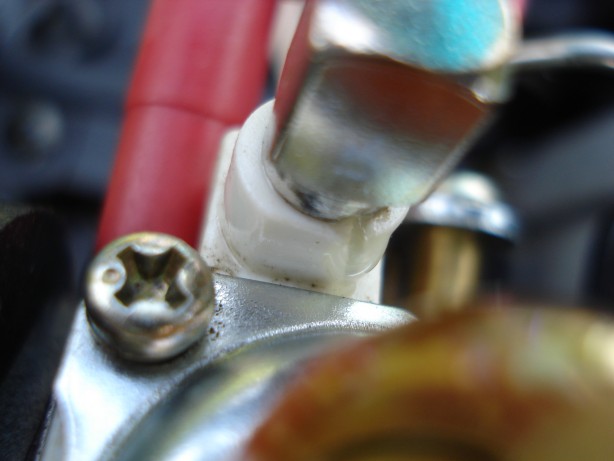
02/07/2009 I noticed the occasional spray of fuel when priming the carb and noticed this crack in the carburettor primer plate where the return pipe leaves the carb. A phonecall to Nitrotek has a replacement on the way. Meanwhile, I have dismantled the plate and filled the crack with resin to see if that fixes it.Before repair, showing crack.
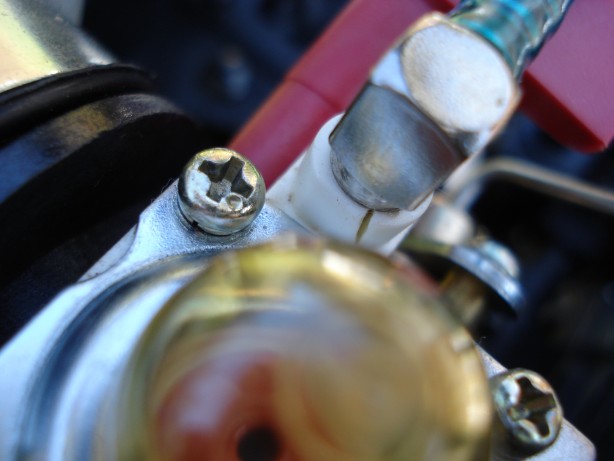
After repair.
04/07/2009 I have had the fuel tank off the car to see why it was not emptying fully. There was a fairly simple reason. There is a weighted bob at the end of the fuel line which is allowed to move about inside the tank. This keeps it in the fuel even when the car is upside down. However, the line had been pushed in too far and the bob was resting on a ledge, not at the very bottom of the tank. This explains why the car was stopping when turning a corner too as the bob was up one side of the tank. Pulling the line out until the bob rested at the bottom of the tank did the job.
04/07/2009 A replacement carburettor primer plate arrived. I was slightly disappointed to find that Nitrotek have sent me a pre-used part. There were particles of material of various sorts including metal fragments stuck to it here and there. There was also a tiny piece of flash partially occluding one of the holes in the channels within the assembly. It does appear (when I have cleaned it up) that it will do the job though. The repair I have carried out on the original appears to have worked. The replacement front shocks and battery pack with charger have still not arrived.
The Fourth Run and the Aftermath.
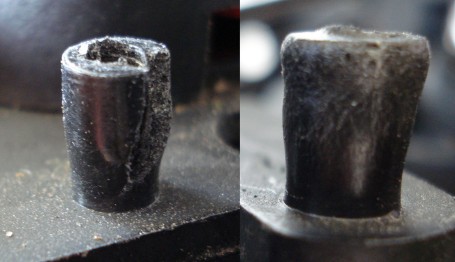
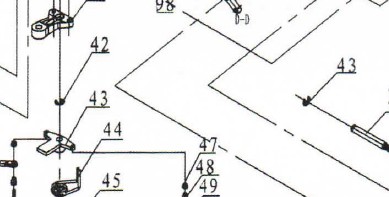
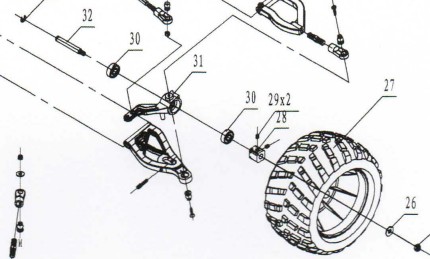
05/07/2009 Another great run at Paull. This time really gave it some welly and used up about 750ml of petrol. A couple of problems. A tyre started to come off the rim. I used superglue gel on it, this fixed it and it was up and running again after a few minutes. The other problem brought the run to an abrupt end. Whilst pottering along on the straight, a wheel fell off for no obvious reason. It had fallen apart. The circlip on the inside of the front left axle had popped off somewhere. The inner bearing had fallen out somewhere and I could not find it. The outer bearing was still on the axle. The wheel assembly was intact. No damage to anything. Just a missing bearing and circlip. Searched around a bit, found nothing, came home to order new bits. To discover a bit of an anomaly on the parts diagram. The circlips on the front wheels are given the part numbers 43, however, there is another 43 on the diagram that is part of the steering mechanism. Part 42 on the diagram is a circlip on top of the steering assembly. I removed this clip and tried it on the axle. It fitted. So it looks like the circlips for the front axles should be numbered 42 and not 43. Unfortunately, the parts ordering on Nitrotek's website lists quite a lot of parts just by these numbers (preceding them with a 'Z'), only very few with descriptions and no pictures. So I have ordered what I think are the right parts and will contact Nitrotek to discuss it when they open (along with an enquiry as to the whereabouts of the replacements that have not yet arrived). I am pleased I decided to fit an extra foam air filter, it has stopped a lot of filth getting into the engine, it was absolutely filthy. I have given it a good wash, dry and resoak with air filter oil.Below, part of the parts diagram showing two different parts with the number 43. The part labeled 42 is a circlip which is the same size as the circlip labelled 43.
I also noticed that the cups on the rear axles, where they engage with the drive shafts appear to be wearing quite alarmingly. They are no longer a straight slot in the cups, the slots are enlarging. I am told by a member of Large Scale Forums that this happens due to the metal being soft and a way to extend the life of the axles is to swap them around. I have done this as it appears to be good advice.
Right:

Left:
06/07/2009 Opened up a low priority 'Ticket' on the Nitrotek website asking a question related to the things I had been ringing them about. It was a relevant question but done more as a test to see if they replied to it. They say on the auto response email that they will get back to me. By 19/07/2009 I had not received an email response so I checked the link in the auto response email to view the status of the ticket. There I see my email to them with no response from Nitrotek, with the status of 'closed'. I have yet to check but this gives me the impression that someone has looked at it, not deemed it worth responding to and then closed it. Great service then. It could be something I did, so I have updated the status back to open and changed the priority to high. 20/07/2009 After one of my (now many) phonecalls to Nitrotek where I mentioned the lack of response to a ticket to them, I received a response to the ticket.
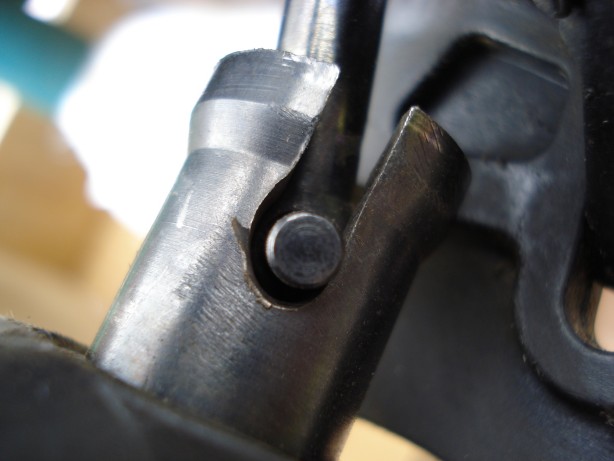
07/07/2009 The wheel bearing and circlip arrived from Nitrotek. The correct bearing but the wrong circlip. The circlip was too small and looks like it is part Z14, part of the front suspension assembly. I rang Nitrotek who said they would send a replacement. Something important to note here come to think of it. All four axles fit like this: There are two grub screws (29) in a block (28) that fastens to the axle (32). The block moves along the axle so that it can be adjusted to the correct length, giving the axle/bearing assembly a tight fit. To get the grub screws out, you must first heat up the axle (I held the front with pliers over a gas ring for a minute and held a fine soldering iron inside the grub screw slot for a few minutes on the rear) as the grub screws are glued in place. I put the grub screws back in and sealed with blue loctite (or rather a cheaper equivalent), this ensures the screws don't shake loose but can be undone when required. Another thing I found that I had missed on my initial checks was that the rear right axle block had been put on the wrong way around. The spacer on the block that keeps it off the bearing was therefore not able to do its job. The block was worn down at the corners where it had been rubbing on the bearing. The bearing appears to be OK. Time will tell.
Cheaper Spares
08/07/2009 Some of Nitrotek's spares seem a bit expensive. It was £1.99 plus postage for one circlip. Initially I thought it would be easier just to order from Nitrotek as required. In the event, it was not as the wrong parts came. So I rang around. The first place I rang (Maplin) had what I wanted. I bought a box of 300 'E' type circlips containing 40 clips suitable for the front wheels and steering (Z42) and 50 clips suitable for elsewhere on the Hummer (Z14)for £2.99 which works out less than buying one clip from Nitrotek! Maplin also has similarly priced boxes of washers and boxes of locking nuts that look very useful for spares too. Preliminary checks on ebay for items such as bearings (608Z) look promising too. This particular bearing seems to be very common as it is used in roller blades and skateboards. Grub screws (M5x5 flat end)are available cheaply on eBay, again, about 30 grub screws for the same price as one from Nitrotek.Here is a list:
Part Description : Shengqi Part : Size : Sourced From
E-Clip Z14 4.8mm Maplin
Nyloc Nut Z25 M6 eBay
Grub Screw Z29 M5x5 Flat end eBay
Bearing Z30 608Z eBay
E-Clip Z42 6.4mm Maplin
AAAAARRRRGGGHHH!
09/07/2009 In the post today. A replacement circlip. The wrong size again, it is the same size as the first wrong one they sent me even though, when I rang them about it, I had been very careful to say exactly what it was I wanted. A replacement battery pack finally arrives but there is no charger with it, so it is useless to me. I ring up Nitrotek again and mention this plus ask as to the whereabouts of the front shocks and rear axles. They say they will chase it up again. I have asked for a refund for the circlip. A prediction here.... No refund will happen, the shocks and rear axles will not arrive and if the charger does arrive it will have been smashed in the post. Or am I being too negative here? I am going to give it all a rest for a week or so to allow my blood pressure to fall a little.20/07/2009 After a rest from it all. As predicted, nothing arrived and no refund. So I rang the good people at Nitrotek once more. As always, they are very pleasant and helpful. So, with a bit of luck I might receive the awaited parts shortly. They asked me to return the two wrong circlips. I have done, but I find it a bit irritating as it cost me an envelope and stamp. The replacement clips I bought from Maplin cost me one penny each, so it is costing me 12p for an envelope and 30p for a stamp to get a 1p clip after I have already paid over £3 for one from Nitrotek (£2.99 plus postage). The fellow I spoke with on the 20th said he would get back to me to let me know what was happening with the parts that had not arrived with me the next day, by telephone. I also gave him my email address. There was no phone call or email from them before I rang them again a week later.
24.07.2009 email sent to Nitrotek mentioning no response regarding the entry here for 20/07/2009. I received no response from that email.
27/07/2009 Having heard nothing from Nitrotek and having received nothing at all in the post, I once more rang Nitrotek to enquire about the various missing items. The front shock absorbers apparently are in the warehouse but they cannot locate them. The charger they can't explain why it has not yet arrived. The circlips have been put in the post to me. The rear axles are being chased up again. As always, Nitrotek have once more allayed my worries. They are very good at making me feel as though, at last, something is happening. Will it?
31/07/2009 A selection of circlips arrive from Nitrotek. Various sizes. Two of which are the ones I originally needed.
13/08/2009 After giving it another rest for a couple of weeks, I rang Nitrotek once more to find the whereabouts of the battery charger, front shocks and rear axle cups. The explanation for the non arrival of the charger was that they had been sent a batch of US chargers and were now in receipt of the correct ones and would get one off to me today. On checking bar code numbers on the recorded delivery labels of the envelopes I kept, I discovered that an item Nitrotek had sent me on 24 July had not arrived with me. Nitrotek did not know what this item was. I think it would either be the front shocks or the rear axle cups. A check on line with the Post Office showed no record of the item. I was told by Nitrotek to contact the Post Office to see if I could find it (I knew this would be futile but I went through the motions anyway). I rang the Post Office (about 15 minutes to finally get through to someone) to be told (shock, horror, surprise) that the item was considered lost as it had not arrived within 15 days. I rang Nitrotek back who said that now, neither the shocks or axles are shown as in stock. They would send me them out when they are in stock. So, I will wait another couple of weeks before ringing again.
14/08/2009 The Battery charger arrives. It seems to work although the instructions state it is for use with 1800mah to 2500mah batteries. The battery I have is 1100mah so theoretically it is no use. Well, I am beginning to lose the will to continue this now. I have put the battery on charge and it seems to be OK. I will give it a test and report back.
08/09/2009 I rang Nitrotek again having received nothing in almost a month. They said the two items I am waiting for are in stock and will send them.
10/09/2009 The parts arrive, shocks and axle cups. The shocks look good but the axle cups are the wrong ones. They have sent me Z59s instead of Z57. I ring them, they apologise and say they will get the correct ones in the post to me tomorrow.
12/09/2009 The axles Z57 arrive. Finally after a couple of days short of 3 months and a lot of telephone calls, I have the hummer in the state it should have been when I bought it. So with the debacle over with for the moment (until I pile the Hummer up and need more spares) I will now say what I think of Nitrotek and their service. The people I spoke with (Mick, Simon and Matt) were always helpful, knowledgeable and friendly. Overall, despite the errors and delays, I am happy with my Hummer. Nitrotek did eventually come up with everything they promised and I got a couple of things out of it for free that strictly speaking I didn't need.
Wheels Coming Loose - Thoughts
I have noticed that on every occasion that I have used the car, the wheels have come loose. There are already washers and Nyloc nuts on the wheels that obviously are not working properly. I could firstly just try new lock nuts, and/or blue Loctite. Or maybe spring washers but I suspect they may just damage the wheels when they work loose. Another thought is to use castle nuts and split pins but preliminary searches show castle nuts at £5 a pair. At that price I would sooner just tighten my nuts every 10 minutes. I don't see why I could not make my own castle nuts using my dremel.Close inspection of the wheel nuts reveals the locking part of the nut is well worn, probably something to do with me having had the wheels off many times. However, according to Wikipedia, nyloc nuts can be reused many times as the 'threads of the bolt do not damage the nylon insert'. I have bought some replacement nuts and will see how they go. Elsewhere I read that they should not work loose and if they do it is probably because they are cheap ones. More on this after the next run then.
Below, a comparison of the nuts. Left is an original, you can just make out the grooves in the nylon bit. Center, a replacement from eBay. Right, one my son picked up for me. I am currently using the ones on the right. The new ones are considerably tighter than the old.

30/05/2010 Fifth run. First run of the year. I have used up most of my glow fuel for the new Thunder Tiger and so resorted to the Hummer today. Lifted it off the top of the wardrobe where it had spent the winter and removed the dust sheet keeping it dust free. I had left it ready for its next use as I always do with any of my toys. So all it needed was fresh batteries, test the electrics and fuel it up. It took a fair bit of effort to start it but once it was going, it ran beautifully until the tank was empty. A trouble free run for the first time ever! No damage, nothing fell off. All I had to do was clean a few bits of grass off it. No loose wheel nuts! It seems I have solved all the teething problems. Although one thing, I am not sure but I think both rear shocks have the slightest of leaks on them. Nothing much at all. Whether it is what has leaked out over winter or whether it was the use that did it I am not sure. Time will tell. Anyhow, that's nothing to worry about. Got plenty of shock oil. The shocks are working well, that's the main thing.
05/05/2010 Sixth run. Engine compression test 110 psi. I have the tester so thought I might as well see what it was. Gave it a good run today. The pull start cord came off the spool but it was easy enough to get it back on. Once I got it started, it took an hour and a half to empty the tank. Not bad. Unfortunately, just before the fuel ran out came the inevitable problem. The rear left wheel hub where the axle engages changed from a square hole to a round one with the consequence of there being no purchase between the drive and the wheel hub. At first I thought it was clutch or diff but was slightly relieved to discover it was a relatively minor problem. Photo:
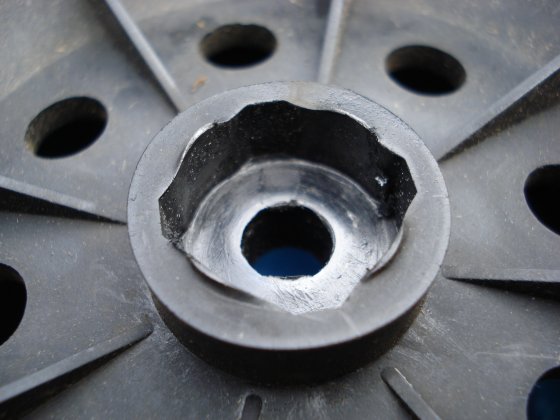
I went to the Nitrotek website to find a price and was horrified to find they want £36.27 plus postage for a replacement hub and tyre Z27. I reckon I can repair it myself rather than pay that extortionate amount for a piece of plastic. Two options. My resin stuff or Araldite. I should make a Plasticine imitation of the axle mounting block, bung it into the wheel and then pour some gunk in to fill the gaps. To test that it was only this that was the problem, I temporarily tightened up the wheel nut quite hard and tried driving the Hummer. It worked fine, so another option is to maybe put a thin rubber type coating on the mating surface and tighten the nut up hard. Maybe a mixture of all of these things. I am certainly not forking out £40 for a wheel.
Use the good wheel and Blu Tack to make a pattern of the hole how it should be
The pattern
Trimmed
Pushed into place
Araldite Rapid worked into the crack with a pin
As the Araldite goes off, trim the excess off with the blade of a knife (handle removed to get in there)
Remove the Blu Tack
That's as far as I have got. Leaving it for a while before doing anything else
I have sanded, filed and scraped the hole to the right size and replaced the wheel. I think I will be lucky if the repair lasts more than 5 minutes though. We shall see next time I use it...
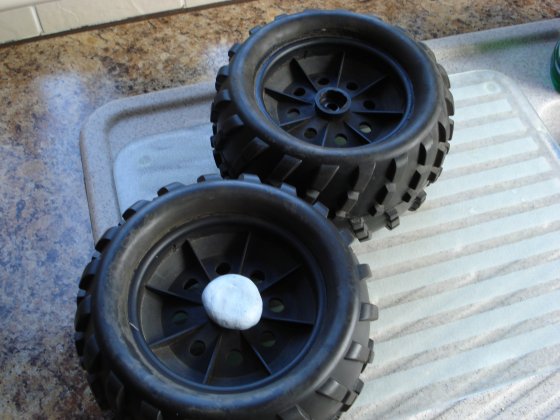
07/05/2010 What was I thinking of? It's only a two wheel drive. No pressure is put on the front hub from a drive shaft. All the wheels are the same apart from left and right tyres being on differently. Therefore I can exchange a rear and front wheel and solve the problem. The rear shock absorbers are leaking. The left one particularly badly. I admit defeat on them. I haven't decided whether to keep topping them up with oil or to run them dry. I shall experiment. The originals worked reasonably well with no oil, that may be the best answer.
21/04/2011 First run of the year in the garden. A short test to make sure all is well. It started very easily after its Winter rest, about half a dozen pulls and it was going. A perfect run, no problems whatsoever.
28/08/2012 After bringing it out of storage, discovered three of the shock absorbers were virtually empty, leaked away. Decided to empty and clean out all of the shocks. Doesn't seem to make any difference to the handling, no more mess. A run at Paull with all the other cars. Despite having checked it out thoroughly beforehand, there was a problem. It started easily enough but when running, the failsafe operated after a couple of minutes. I put in a fresh set of batteries. It stopped again after a couple of minutes, the failsafe once more. Somehow the settings in the failsafe were wrong, reckoning the batteries were low. Reset the failsafe and all seemed well. Eventually, after half a tank of fuel, the engine stopped, the carb needed tuning. Here it is the tuning guide for future reference. The manual has H for low and L for high! Wrong. I have corrected it here:
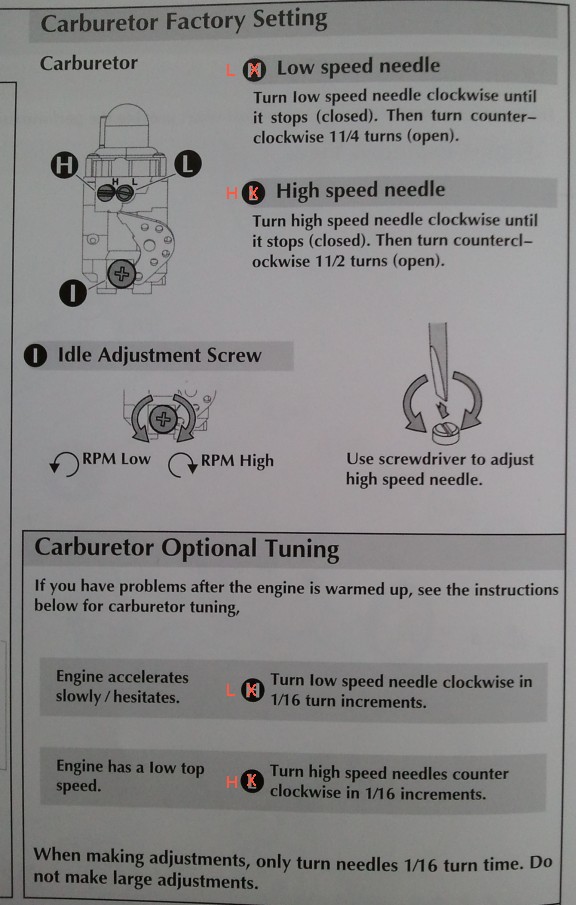
In the course of verifying the above correction I discovered the carb is a Walbro WT 227-1. Used in chain saws. It was very odd, I could not find a mention anywhere on the internet about the above error. I thought I could verify it by examining the needles as they looked different to each other on page 19 of the manual (part ZEP67). Nowhere on the internet seemed to have a picture of the needles. The needles in my carb look exactly the same as each other. The drawings on the Walbro website for the carb show both needles looking the same.
31/08/2012 Another run at Paull with John and Peter with all of our cars. The engine of the Hummer runs fine. The radio seems dodgy. Fresh batteries all around but it still needs the transmitter to be within 6 feet of it before it will work. The failsafe keeps operating, when you get close to the car, it starts working again. Watching eBay for a replacement receiver/transmitter. Transmitter seems to work fine at home. Will try it again and borrow a different transmitter before committing to anything. Finally fixed the wing mirrors and gun to the shell. Lost the gun but the wing mirrors are still there.
05/09/2012 A run in the garden. The throttle cut out almost immediately. Steering OK. Removed the crystal from the transmitter and tried it in Peter's known working transmitter. The replacement transmitter worked fine. The Hummer ran OK after a bit of tuning. The batteries in the suspect transmitter were at 12.2v, new. So I shall dismantle it to see if there is anything to see. Meanwhile, I have dug out my 30 year old Sanwa 2 channel transmitter from the loft and will use that. Compression test: 100 PSI. 10 down from 5/5/2010.
07/09/2012 Messing about with radios in the garden shows that my old two channel radio isn't up to the job. To make it work fully, it needs changes to both the transmitter levers, steering and throttle servos that I don't want to make for various reasons. Looks like I am going to have to fork out for a new transmitter.
08/09/2012 After realising the manual was wrong only the other day, finally got a handle on tuning the hummer. Managed to get it mostly sorted out in the garden and street, but it needs a good run in a field to finish the job properly.
Thanks to the manual, I beleived The HSN was to the front of the car and the LSN was to the rear of the car (see above photo of relevant part of the manual with my correction), not registering the letters H and L meant something and were not just labels. I hadn't tried tuning it until this year. In the past, I had tentatively turned the HSN a bit, thinking it was the LSN. When nothing happened, I just returned the needle to its original setting and left it. So the Hummer has been running rich for a long time. The reason for it occasionally stopping and not restarting was flooding. I thought taking the plug out and turning the engine over was sufficient to clear flooding but read somewhere that to clear it properly on this engine, it needs a bit more than that. So now, I am going to work on getting the plug to look how it should. Seeing a tuning video on Youtube helped me realise the manual was wrong.
Testing Compression.

Although in the end a simple short adapter was more accurate
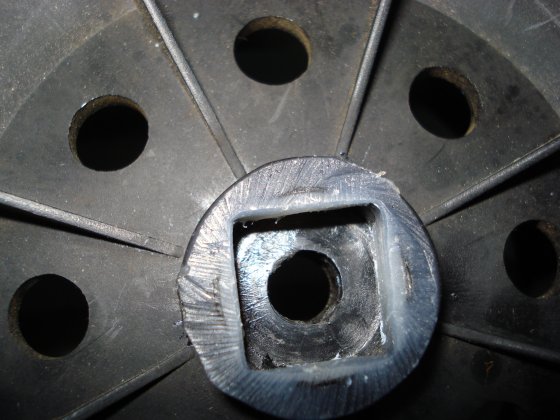
How it looks 08/09/2012
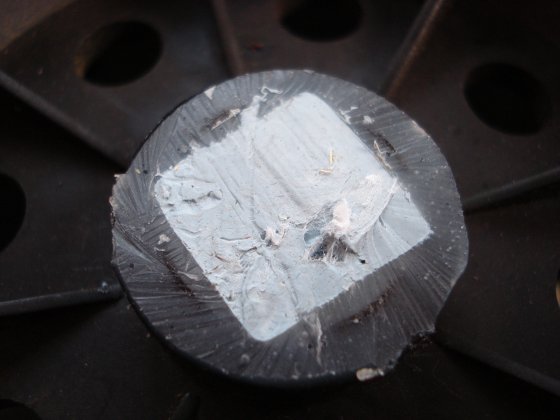
The plug 08/09/2012 after a bit of tuning.
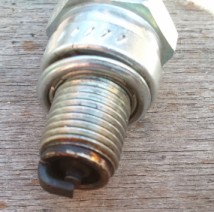
It had a lot more carbon on it before tuning
02/10/2012 Bought a Team Associated SC10 XP TRS401SS 4 Channel 2.4 GHz Receiver from the US. The same as in my two other cars, the EB4 and MT4. This means I can now use one transmitter for all three cars. It releases a lot of space in the car making a change in the radio and battery compartments possible. The separate faisafe is no longer needed as one is inbuilt into the receiver. The receiver was won on eBay brand new and dirt cheap so I am dead chuffed at £17 including postage from the US. It was a straight swop, all the plugs fit into the receiver which is so small that it fits inside the lid of the receiver box behind the on/off switch, leaving the lower part of the receiver box completely empty. It looks like a square four x AA battery holder will fit in there. On connecting up and testing, it seems the steering is far more responsive and will travel to its full extent (never did before). Because the transmitter is very configurable, I expect to be very happy with the results when it is all set up properly. More later...
09/07/2013 First run of the year, in the garden quick test. Started very easily, half a dozen pulls. No breakages. Radio performs well. Steering as suspected is far more responsive and travels much further than with the original radio. In fact the bodywork fouls the tyre anything over 70% of full lock with the shell raised as far as the posts will allow. The transmitter is fully programmable and so steering left and right set to 70% maximum.
Early 2021 I gave it to my son. Still in good working order. We will maybe hear further about it at some stage.